Replace the hard drive and RAM in the aluminum Mac Mini
Desktops
[MUSIC] [MUSIC]
I'm Dan Graziano, and I'm here with a brand new Mac Mini. I'm Dan Graziano, and I'm here with a brand new Mac Mini.
In one of my recent videos, I showed you how to replace the hard drive in Mac Mini models from 2009 and earlier. In one of my recent videos, I showed you how to replace the hard drive in Mac Mini models from 2009 and earlier.
A number of you have reached out to me about the process for newer models, like these ones. A number of you have reached out to me about the process for newer models, like these ones.
Believe it or not, Apple actually made it a lot easier to swap out the hard drive, and even the memory. Believe it or not, Apple actually made it a lot easier to swap out the hard drive, and even the memory.
To get the job done, you'll need a replacement 2.5 inch hard drive, or solid state drive, and also a T6 and T8 screwdriver. To get the job done, you'll need a replacement 2.5 inch hard drive, or solid state drive, and also a T6 and T8 screwdriver.
As always, be sure to work on a static free surface like this wood table, and to discharge any electrostatic buildup before handling any internal components. As always, be sure to work on a static free surface like this wood table, and to discharge any electrostatic buildup before handling any internal components.
You should also transfer your old data to your new hard drive using a program like Time Machine or SuperDuper, which can be used to clone your old drive. You should also transfer your old data to your new hard drive using a program like Time Machine or SuperDuper, which can be used to clone your old drive.
To start, flip the Mac Mini over, and remove the black cover by twisting it counterclockwise. To start, flip the Mac Mini over, and remove the black cover by twisting it counterclockwise.
If you're only interested in replacing the computer's memory, simply spread the clips that keep the memory sticks in place, and swap them out. If you're only interested in replacing the computer's memory, simply spread the clips that keep the memory sticks in place, and swap them out.
To access the hard drive, we need to remove the three T6 screws that keep the fan in place. To access the hard drive, we need to remove the three T6 screws that keep the fan in place.
Gently lift the fan out of the case, and remove the cable connected to the motherboard. Gently lift the fan out of the case, and remove the cable connected to the motherboard.
On the left hand side, you'll see a plastic cover. On the left hand side, you'll see a plastic cover.
This is held in with a T6 **** that's located right over here. This is held in with a T6 **** that's located right over here.
Remove the ****, and shimmy the cover out of the case. Remove the ****, and shimmy the cover out of the case.
Once that's done, we remove the antenna grill by unscrewing four T8 screws. Once that's done, we remove the antenna grill by unscrewing four T8 screws.
Be careful when lifting the grill out of the neck, [INAUDIBLE] the case. Be careful when lifting the grill out of the neck, [INAUDIBLE] the case.
The hard drive is located under the antenna grill. The hard drive is located under the antenna grill.
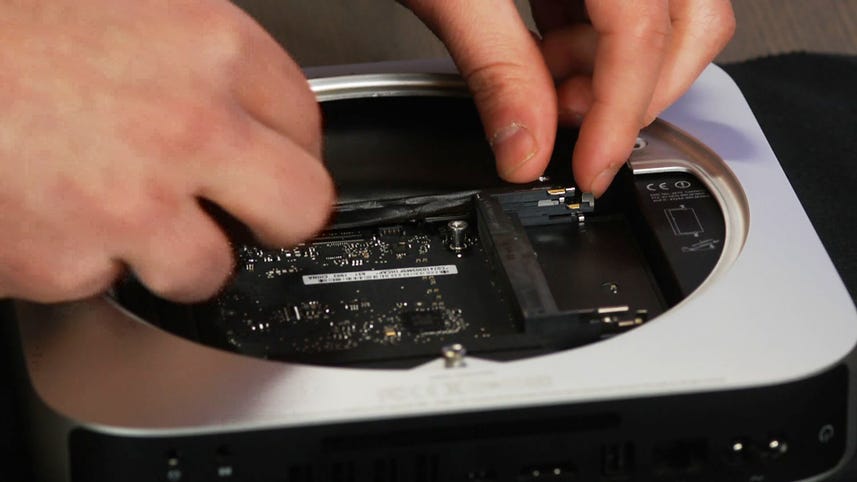
Before popping it out, you must disconnect the drive from the motherboard. Before popping it out, you must disconnect the drive from the motherboard.
Once you've gotten it out, remove the two T8 screws from the side of the drive, and **** them into your new one. Once you've gotten it out, remove the two T8 screws from the side of the drive, and **** them into your new one.
Gently peel the black protective cover off the drive, remove the connector, and attach them both to your new drive. Gently peel the black protective cover off the drive, remove the connector, and attach them both to your new drive.
Getting the drive back into the Mac Mini can be tricky. Getting the drive back into the Mac Mini can be tricky.
If you look, there are two slots the screws sit in. If you look, there are two slots the screws sit in.
You wanna make sure the screws are in a top two slot, and not the bottom. You wanna make sure the screws are in a top two slot, and not the bottom.
Try using a pair of tweezers or another small tool if you're having trouble. Try using a pair of tweezers or another small tool if you're having trouble.
After getting the drive in place, don't forget to reattach the connector to the motherboard. After getting the drive in place, don't forget to reattach the connector to the motherboard.
Replace the four T8 screws and the antenna grill, followed by the plastic guard, and the T6 **** that keeps it in place. Replace the four T8 screws and the antenna grill, followed by the plastic guard, and the T6 **** that keeps it in place.
Reconnect the fan to the motherboard, and secure it in with the three T6 screws. Reconnect the fan to the motherboard, and secure it in with the three T6 screws.
Then just simply replace the cover, and turn it clockwise to lock it in. Then just simply replace the cover, and turn it clockwise to lock it in.
For more information, check on my article on howto.cnet.com. For more information, check on my article on howto.cnet.com.
As always, feel free to reach out to me on Twitter with any questions or comments. As always, feel free to reach out to me on Twitter with any questions or comments.
I'm Dan Graziano for CNET, and that's how you replace the hard drive and memory in the aluminum Mac Mini. I'm Dan Graziano for CNET, and that's how you replace the hard drive and memory in the aluminum Mac Mini.
Thanks for watching. Thanks for watching.
[MUSIC] [MUSIC]
[MUSIC] [MUSIC]
I'm Dan Graziano, and I'm here with a brand new Mac Mini. I'm Dan Graziano, and I'm here with a brand new Mac Mini.
In one of my recent videos, I showed you how to replace the hard drive in Mac Mini models from 2009 and earlier. In one of my recent videos, I showed you how to replace the hard drive in Mac Mini models from 2009 and earlier.
A number of you have reached out to me about the process for newer models, like these ones. A number of you have reached out to me about the process for newer models, like these ones.
Believe it or not, Apple actually made it a lot easier to swap out the hard drive, and even the memory. Believe it or not, Apple actually made it a lot easier to swap out the hard drive, and even the memory.
To get the job done, you'll need a replacement 2.5 inch hard drive, or solid state drive, and also a T6 and T8 screwdriver. To get the job done, you'll need a replacement 2.5 inch hard drive, or solid state drive, and also a T6 and T8 screwdriver.
As always, be sure to work on a static free surface like this wood table, and to discharge any electrostatic buildup before handling any internal components. As always, be sure to work on a static free surface like this wood table, and to discharge any electrostatic buildup before handling any internal components.
You should also transfer your old data to your new hard drive using a program like Time Machine or SuperDuper, which can be used to clone your old drive. You should also transfer your old data to your new hard drive using a program like Time Machine or SuperDuper, which can be used to clone your old drive.
To start, flip the Mac Mini over, and remove the black cover by twisting it counterclockwise. To start, flip the Mac Mini over, and remove the black cover by twisting it counterclockwise.
If you're only interested in replacing the computer's memory, simply spread the clips that keep the memory sticks in place, and swap them out. If you're only interested in replacing the computer's memory, simply spread the clips that keep the memory sticks in place, and swap them out.
To access the hard drive, we need to remove the three T6 screws that keep the fan in place. To access the hard drive, we need to remove the three T6 screws that keep the fan in place.
Gently lift the fan out of the case, and remove the cable connected to the motherboard. Gently lift the fan out of the case, and remove the cable connected to the motherboard.
On the left hand side, you'll see a plastic cover. On the left hand side, you'll see a plastic cover.
This is held in with a T6 **** that's located right over here. This is held in with a T6 **** that's located right over here.
Remove the ****, and shimmy the cover out of the case. Remove the ****, and shimmy the cover out of the case.
Once that's done, we remove the antenna grill by unscrewing four T8 screws. Once that's done, we remove the antenna grill by unscrewing four T8 screws.
Be careful when lifting the grill out of the neck, [INAUDIBLE] the case. Be careful when lifting the grill out of the neck, [INAUDIBLE] the case.
The hard drive is located under the antenna grill. The hard drive is located under the antenna grill.
Before popping it out, you must disconnect the drive from the motherboard. Before popping it out, you must disconnect the drive from the motherboard.
Once you've gotten it out, remove the two T8 screws from the side of the drive, and **** them into your new one. Once you've gotten it out, remove the two T8 screws from the side of the drive, and **** them into your new one.
Gently peel the black protective cover off the drive, remove the connector, and attach them both to your new drive. Gently peel the black protective cover off the drive, remove the connector, and attach them both to your new drive.
Getting the drive back into the Mac Mini can be tricky. Getting the drive back into the Mac Mini can be tricky.
If you look, there are two slots the screws sit in. If you look, there are two slots the screws sit in.
You wanna make sure the screws are in a top two slot, and not the bottom. You wanna make sure the screws are in a top two slot, and not the bottom.
Try using a pair of tweezers or another small tool if you're having trouble. Try using a pair of tweezers or another small tool if you're having trouble.
After getting the drive in place, don't forget to reattach the connector to the motherboard. After getting the drive in place, don't forget to reattach the connector to the motherboard.
Replace the four T8 screws and the antenna grill, followed by the plastic guard, and the T6 **** that keeps it in place. Replace the four T8 screws and the antenna grill, followed by the plastic guard, and the T6 **** that keeps it in place.
Reconnect the fan to the motherboard, and secure it in with the three T6 screws. Reconnect the fan to the motherboard, and secure it in with the three T6 screws.
Then just simply replace the cover, and turn it clockwise to lock it in. Then just simply replace the cover, and turn it clockwise to lock it in.
For more information, check on my article on howto.cnet.com. For more information, check on my article on howto.cnet.com.
As always, feel free to reach out to me on Twitter with any questions or comments. As always, feel free to reach out to me on Twitter with any questions or comments.
I'm Dan Graziano for CNET, and that's how you replace the hard drive and memory in the aluminum Mac Mini. I'm Dan Graziano for CNET, and that's how you replace the hard drive and memory in the aluminum Mac Mini.
Thanks for watching. Thanks for watching.
[MUSIC] [MUSIC]